 Save to Pinterest
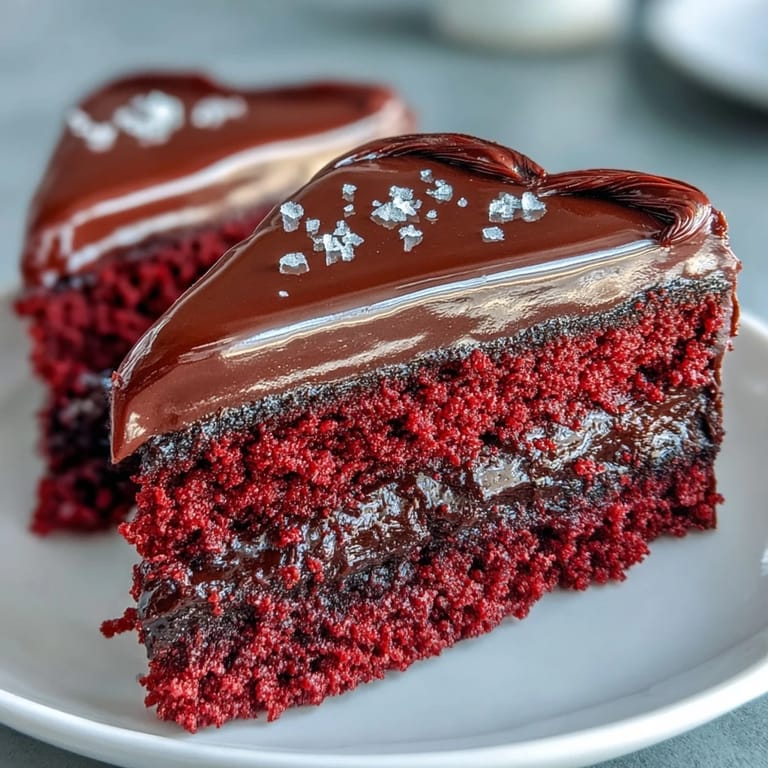
 My daughter spotted a vintage Betty Boop poster at a thrift shop and begged me to recreate the character on a cake for her birthday. I had no idea what I was getting into, but the challenge lit a spark. After three practice runs with melted chocolate and parchment paper, I finally nailed the silhouette—and the look on her face when she saw it made every smudged attempt worth it. This red velvet heart became our signature celebration cake, and now friends request it by name.
The first time I served this at a potluck, a friend asked if I had ordered it from a bakery. I laughed and showed her the parchment paper still sitting on my counter, covered in chocolate drips and failed Betty Boop outlines. She couldn't believe something so polished had come from my messy kitchen. That moment reminded me that homemade doesn't have to mean humble—it can be bold, fun, and a little bit fancy.
Ingredients
- Cake flour: Sifted cake flour creates an incredibly tender crumb that melts on your tongue, far softer than all-purpose flour would deliver.
- Natural unsweetened cocoa powder: Just a hint deepens the red color and adds a subtle earthiness without turning the cake into chocolate territory.
- Baking powder and baking soda: The combo gives the cake its signature lift, and the vinegar-baking soda reaction creates those airy pockets that make red velvet so light.
- Unsalted butter: Room temperature butter creams beautifully with sugar, building the fluffy base that holds the entire structure together.
- Granulated sugar: It sweetens and also helps aerate the batter when beaten with butter, giving you that cloud-like texture.
- Large eggs: Room temperature eggs blend smoothly and emulsify the batter, preventing a dense or greasy crumb.
- Buttermilk: The acidity tenderizes the gluten and adds a gentle tang that balances the sweetness perfectly.
- Red gel food coloring: Gel-based coloring delivers vibrant red without thinning the batter, and a little goes a long way.
- Pure vanilla extract: It rounds out the flavor and makes the frosting taste like something from a high-end bakery.
- White vinegar: The acid reacts with baking soda to create lift and also brightens the red hue in the batter.
- Cream cheese: Room temperature cream cheese beats smooth and gives the frosting that signature tangy richness.
- Powdered sugar: Sifted powdered sugar prevents lumps and creates a silky, spreadable frosting.
- Dark chocolate or candy melts: Dark chocolate sets firm and peels cleanly from parchment, making it ideal for delicate silhouette work.
Tired of Takeout? 🥡
Get 10 meals you can make faster than delivery arrives. Seriously.
One email. No spam. Unsubscribe anytime.
Instructions
- Prep Your Pans:
- Preheat your oven to 350°F and grease two heart-shaped pans generously, then line the bottoms with parchment to prevent sticking. This extra step saves you from heartbreak when it's time to unmold.
- Mix the Dry Ingredients:
- Whisk together the sifted cake flour, cocoa powder, baking powder, baking soda, and salt in a medium bowl. Set it aside so it's ready when you need it.
- Cream Butter and Sugar:
- Beat the room temperature butter on medium speed until creamy, then gradually add sugar and beat for 2 to 3 minutes until the mixture looks pale and fluffy. This step incorporates air and builds the cake's structure.
- Add Eggs One at a Time:
- Crack in one egg at a time, beating on low after each addition just until blended, and scrape down the bowl sides as needed. Overbeating now can deflate your batter.
- Stir in Color and Flavor:
- Mix in the red gel food coloring, vanilla extract, and white vinegar until the batter is evenly tinted. The color should be bold and uniform.
- Alternate Dry and Wet:
- With the mixer on low, add one-third of the dry ingredients, then half the buttermilk, mixing just until incorporated, and repeat, ending with the last third of dry ingredients. Overmixing makes the cake tough.
- Activate the Baking Soda:
- In a small cup, combine 1 teaspoon vinegar with baking soda, then gently fold the foaming mixture into the batter. This reaction creates a light, airy crumb.
- Divide and Bake:
- Divide the batter evenly between the prepared pans, smooth the tops with an offset spatula, and bake on the center rack for 25 to 30 minutes, or until a toothpick inserted in the center comes out clean. The cakes should spring back when gently pressed.
- Cool Completely:
- Let the cakes cool in the pans for 10 minutes, then run a thin knife around the edges, invert onto wire racks, and remove the parchment. Cooling completely prevents the frosting from melting.
- Make the Cream Cheese Frosting:
- Beat the cream cheese and butter on medium speed for 2 minutes until smooth, then gradually add sifted powdered sugar, a pinch of salt, and vanilla extract, beating on low until combined and fluffy. Keep it covered in the fridge if you're not using it right away.
- Level and Layer:
- If desired, level the cake domes with a serrated knife, then place one heart layer on a cake board or plate and pipe or spread about three-quarters of a cup of frosting over the top. Top with the second layer, press gently, and refrigerate for 15 minutes to set the crumb coat.
- Apply the Crumb Coat:
- Spread a thin layer of frosting over the entire cake to seal in crumbs, then chill for another 10 minutes. This step makes the final coat smooth and professional-looking.
- Finish the Frosting:
- Add a final smooth layer of frosting, using an offset spatula to create swirls or leave it sleek as desired. Take your time and warm the spatula under hot water if you want an ultra-smooth finish.
- Create the Betty Boop Silhouette:
- Place a printed stencil under a sheet of parchment, then pipe or brush melted dark chocolate over the outline. Allow the chocolate to fully set at room temperature or in the refrigerator for 10 minutes.
- Place the Silhouette:
- Carefully peel the chocolate silhouette from the parchment and lift it onto the center of the cake, pressing gently so it adheres to the frosting. Handle it delicately to avoid breakage.
- Decorate and Chill:
- Decorate the cake edges with additional frosting rosettes, edible glitter, or red sugar pearls, then chill the cake for 30 minutes before serving to let the frosting set. Slice with a warm, clean knife for neat hearts.
 Save to Pinterest
 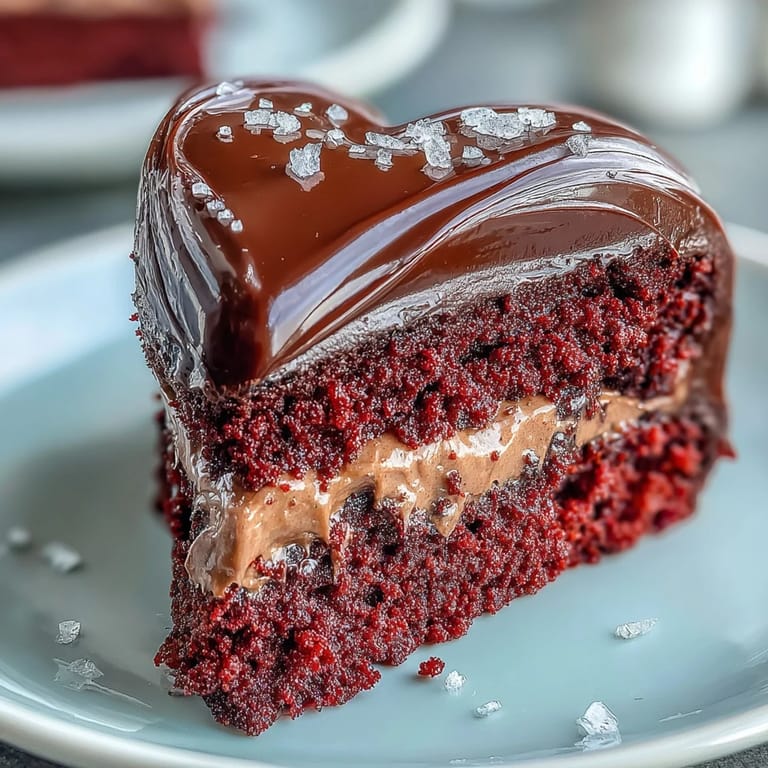 Save to Pinterest
 One evening, my neighbor stopped by just as I was peeling the Betty Boop silhouette off the parchment. She watched me nervously lift the fragile chocolate shape, and when it landed perfectly on the frosted heart, we both cheered like we'd won something. That small victory reminded me that baking isn't just about the final slice—it's about those tiny moments of suspense and relief that make the whole process feel alive. We shared a slice right there in the kitchen, frosting smudged on our fingers, laughing at how serious we'd been.
Achieving the Perfect Red Velvet Crumb
The magic of red velvet lies in the balance between cocoa and buttermilk, which creates a tender crumb with a hint of chocolate and a tangy finish. I learned the hard way that using too much cocoa turns the cake into a chocolate cake with red food coloring, losing that signature subtle flavor. Sifting the cake flour is also crucial—it removes lumps and aerates the flour, giving you that melt-in-your-mouth texture. Don't rush the creaming step either, because beating butter and sugar until pale and fluffy incorporates air that makes the cake rise beautifully.
Mastering Cream Cheese Frosting
Cream cheese frosting can go from silky to soupy in seconds if your ingredients aren't at room temperature. I once tried to salvage cold cream cheese by microwaving it, and the frosting turned into a runny mess that slid right off the cake. Now I leave the cream cheese and butter on the counter for at least an hour before I start, and I beat them until they're completely smooth before adding any sugar. Sifting the powdered sugar is another step I never skip—it prevents gritty lumps and makes the frosting taste professional.
Working with Chocolate Silhouettes
Creating a chocolate silhouette feels intimidating, but it's surprisingly forgiving once you get the hang of it. I print a Betty Boop outline, slip it under parchment paper, and trace the shape with melted dark chocolate using a piping bag or a small spoon. The key is letting the chocolate set completely—if you try to peel it too soon, it cracks or smudges. Once it's firm, it lifts off the parchment cleanly and holds its shape beautifully on the frosted cake.
- Use a toothpick to smooth any jagged edges while the chocolate is still wet.
- Refrigerate the silhouette for 10 minutes if you're in a hurry, but room temperature setting gives you more control.
- If the silhouette breaks, melt more chocolate and use it as glue to piece it back together on the cake.
 Save to Pinterest
 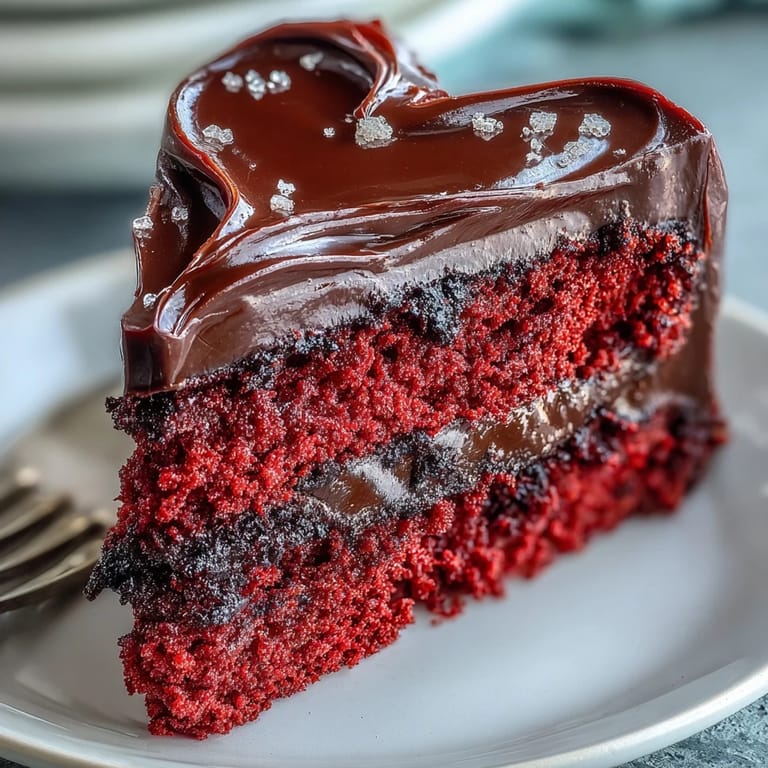 Save to Pinterest
 This cake has become more than just a dessert in our house—it's a reminder that a little creativity and a lot of patience can turn something ordinary into something unforgettable. Every time I peel that chocolate silhouette off the parchment, I feel like a kid again, proud and a little bit amazed.
Recipe Questions & Answers
- → What makes the crumb so tender?
The combination of cake flour rather than all-purpose, buttermilk for acidity and moisture, and careful mixing prevents gluten development. The vinegar-baking soda reaction also creates tiny air pockets for a lighter texture.
- → Can I make the chocolate silhouette in advance?
Absolutely. Prepare the dark chocolate cutouts up to a week ahead and store between parchment paper in an airtight container at room temperature. They'll remain crisp and ready to place when frosting is complete.
- → Why use gel food coloring instead of liquid?
Gel coloring delivers concentrated pigment without adding excess liquid that could alter the batter consistency. Liquid food coloring requires significantly more volume to achieve the same vibrant red shade, potentially affecting the final crumb structure.
- → How do I prevent the layers from doming?
Bake at 350°F on the center rack, and avoid opening the oven during the first 20 minutes. If doming still occurs, level with a serrated knife once cooled. The heart pans naturally distribute heat evenly for relatively flat layers.
- → Can I use regular butter instead of room temperature?
Room temperature butter is essential—it incorporates air when creamed with sugar, creating lift and tenderness. Cold butter won't blend properly, while melted butter will alter the crumb structure, resulting in a denser final product.
- → What's the purpose of the crumb coat?
The thin initial layer of frosting seals in loose crumbs, creating a clean base for the final smooth layer. Chilling between coats ensures the frosting sets properly, preventing the red crumbs from marring the pristine white finish.